はじめに
こんにちは!
去年に引き続き、今年も書きます。
Fusic Advent Calendar 2018 19 日目の記事です!
今回は、「Angular + Firebase + PWA で Push 通知機能を実装」についてまとめてみました 👏
やりたいこと
PWA で Push 機能実装したい!
※ PWA って何?的な説明は、以下を見てください
- https://developers.google.com/web/fundamentals/codelabs/your-first-pwapp/?hl=ja
- https://developers.google.com/web/progressive-web-apps/
開発環境
- Angular 6
-
Firebase
- Realtime Database
- Functions
さっそく実装に入りましょう 🤩
実装については、以下の流れで説明していきたいと思います!
- 必要なモジュールなどをインストール
- Push 機能実装:アプリ側
- Push 機能実装:Firebase Functions 側
必要なモジュールなどをインストール
Firebase CLI をインストール
yarn global add firebase-tools@latest※ Firebase CLI の詳細については、こちらを見て下さい!
Firebase モジュールをインストール
yarn add firebase --savehttps://www.npmjs.com/package/firebase
Push 機能実装:アプリ側
manifest.json を修正
ハードコード値 gcm_sender_id を指定するウェブアプリ マニフェストを追加する必要があります。
「ブラウザ送信者 ID」と、Firebase プロジェクト設定に示されるプロジェクト固有の送信者 ID 値とを混同しないでください。 manifest.json のブラウザ送信者 ID は固定値で、すべての FCM JavaScript クライアントで共通です。
gcm_sender_idは、固定値ですので、変更しないでください!
{
  ... 省略 ...
  "gcm_sender_id": "103953800507" // ← gcm_sender_idを追加  ... 省略 ...
}
メッセージサービスワーカーを作成
Push メッセージには、 service worker が必要になります。
まず、Firebase で messagingSenderIdをコピーしておきましょう。

次は、srcディレクトリの配下に firebase-messaging-sw.js を作成します。
そして、↑ でコピーしたmessagingSenderId を、以下の firebase.initializeApp() に貼りつけます!
// Give the service worker access to Firebase Messaging.
// Note that you can only use Firebase Messaging here, other Firebase libraries
// are not available in the service worker.
importScripts('https://www.gstatic.com/firebasejs/5.5.0/firebase-app.js');
importScripts('https://www.gstatic.com/firebasejs/5.5.0/firebase-messaging.js');

// Initialize the Firebase app in the service worker by passing in the
// messagingSenderId.
firebase.initializeApp({
  messagingSenderId: '' // ↑でコピーしたmessagingSenderIdを追加
});

// Retrieve an instance of Firebase Messaging so that it can handle background
// messages.
const messaging = firebase.messaging();

messaging.setBackgroundMessageHandler(function(payload) {
  const notificationTitle = payload.notification.title;
  const notificationOptions = {
    body: payload.notification.body,
    icon: payload.notification.icon
  };

  return self.registration.showNotification(notificationTitle, notificationOptions);
});

self.addEventListener('install', function(event) {
  console.log('Service Worker installing.');
});

self.addEventListener('activate', function(event) {
  console.log('Service Worker activating.');
});
これで、ユーザーがアプリを閉じても、アプリが新しいメッセージを検知することができます!
angular.json を修正
angular.json にmanifest.json, firebase-messaging-sw.js を追加
{
  ... 省略 ...
  "projects": {
    "architect": {
      "build": {
        "options": {
          "assets": [
            "src/favicon.ico",
            "src/assets",
            "src/manifest.json", // ←追加            "src/firebase-messaging-sw.js" // ←追加          ]
        }
      }
    }
  }
}
メッセージサービスを作成
まずは、Firebase の「鍵ペア」を生成する必要があります。
Firebase で「鍵ペア」を生成
「プロジェクトの設定>クラウドメッセージング」に入って、鍵ペアを生成してください。

生成した鍵ペアをコピーしておいてください ⭐️
サービスを作成
メッセージサービスは、Push 通知メッセージを受け取るユーザーの許可を得る役割をします。
ng g service messagingざっくり以下のような構成になります!
getPermission()
- ユーザーから Push 通知を行う許可を取得
updateToken()
- Firebase に FCM トークンを保存
- ユーザーに Push 通知を送る度にこのトークンを参照するので、Firebase に保存する
receiveMessage()
- メッセージを受信
import { Injectable } from '@angular/core';
import { AngularFireDatabase } from 'angularfire2/database';
import { AngularFireAuth } from 'angularfire2/auth';
import { BehaviorSubject } from 'rxjs';
import * as firebase from 'firebase';
import 'firebase/messaging';

@Injectable({
  providedIn: 'root'
})
export class MessagingService {
  messaging = firebase.messaging();
  currentMessage = new BehaviorSubject(null);
  constructor(
    private db: AngularFireDatabase,
    private afAuth: AngularFireAuth
  ) {
    // Add the public key generated from the console here.
    this.messaging.usePublicVapidKey(
      '' // <- ここに、上記で生成した鍵ペアを貼りつけてください
    );
  }

  updateToken(token) {
    this.afAuth.authState.subscribe(user => {
      if (!user) {
        return;
      }

      const data = { [user.uid]: token };
      this.db.object('fcmTokens/').update(data);
    });
  }

  getPermission() {
    this.messaging
      .requestPermission()
      .then(() => {
        console.log('Notification permission granted.');
        return this.messaging.getToken();
      })
      .then(token => {
        console.log(token);
        this.updateToken(token);
      })
      .catch(err => {
        console.log('Unable to get permission to notify.', err);
      });
  }

  receiveMessage() {
    this.messaging.onMessage(payload => {
      console.log('Message received. ', payload);
      this.currentMessage.next(payload);
    });
  }
}
app.module.ts を修正
// ... 省略 ...
import { MessagingService } from './service/messaging.service';

@NgModule({
  // ... 省略 ...
  providers: [
    MessagingService, // ← を追加
  ]
})
export class AppModule {}
app.component.ts を修正
// ... 省略 ...
import { MessagingService } from './service/messaging.service';
@Component({
selector: 'app-root',
templateUrl: './app.component.html',
styleUrls: ['./app.component.scss']
})
export class AppComponent implements OnInit {
message;
constructor(private msgService: MessagingService) {}
ngOnInit() {
this.msgService.getPermission();
this.msgService.receiveMessage();
this.message = this.msgService.currentMessage;
}
// ... 省略 ...
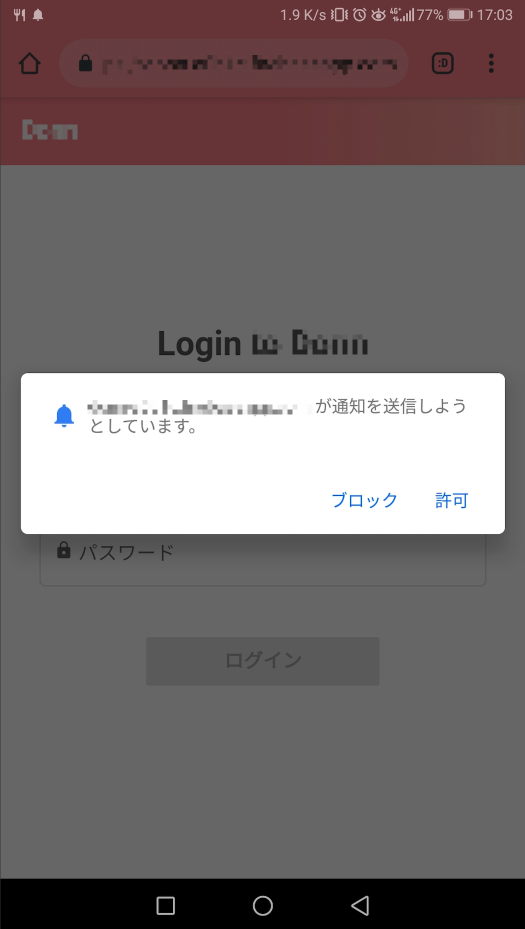
}これで、以下のようにアプリにアクセスすると、
「通知を許可しますか?」という確認アラートが表示されるようになります!🎉
引き続き、Firebase Functions 側の実装については、以下の記事をご覧ください!
👉 Angular + Firebase + PWA で Push 通知機能を実装する(Firebase Functions 側)